Dutch Vitpilen 701

Since the shock is getting some love I thought it was only fair to give the forks some attention as well.

The little springs on the outside of the dust caps were starting to corrode a bit. So some supplies were purchased:
20250108_164718.jpg

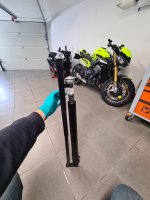
Took the forks out, opened up the topcap and was then reminded I never disassembled a pair of upside forks and lacked a spring compressor. A quick search online came up with this as an easy and simple tool:
20250102_150915.jpg

Bit of pvc and some M8 threads and nuts. All for free, because apparently I had over €50 on my loyalty card for the local hardware store. (This was less than a fiver btw)

You use the tool to push down on the spring and your lovely assistant is then able to put a wrench on the hex underneath the top cap.

This all looked a lot easier on video than it was on these forks, it took a lot of force. This is doable on disassembly, but I wasn't looking forward to assembly.

So I ordered a decent spring compressor online 😅

One fork leg apart:
20250104_132051.jpg

Seals replaced and since this was a couple days later the new tool had been delivered:
20250108_134226.jpg

(Still need to mount my vice to the workbench 🤦🏻‍♂️, it's been on the to do list for about 10 years)

Forks back together with fresh oil and seals:
20250108_151400.jpg

Also cleaned the caliper while it was off the bike:
20250108_161801.jpg

And everything back together:
20250108_164045.jpg

I hope I can pick the serviced rear shock up tomorrow, so that can go back in next weekend.
 

Attachments

  • 20250108_134226.jpg
    20250108_134226.jpg
    310.9 KB · Views: 6
Some more work on the Vitpilen done.

Ever since I first took one out for a test ride I thought the left hand switch gear looked cheap.

With the added cruise control button cluster the left bar was getting pretty full. The reach to the cruise control buttons was longer than I liked, and switching it off with the middle button, needed attention, if I pressed it without looking, I would often hit the resume button at the same time, which resulted in the cruise control disengaging and directly re engaging.

This was the left handlebar with the separate cruise control switch:
1000010483.jpg
So after looking at quite a few left hand switch gear clusters online, I found a cluster for a Yamaha FJR with an adjustable screen that looked like it could work.

A second hand unit was purchased:
1000010671.jpg
Some fiddling with wires and a multimeter:
1000005313.jpg
I had to modify the copper contact plate in the screen switch to make it do what it needed to do, but now, at least according to the multimeter, it should work.

The new set up:
1000021550.jpg

The screen button is a two way switch, if I press the bottom half it should engage the cruise control, or decrease the speed if it is already engaged. Pressing the top half of the button should resume the cc, or increase the speed if it is already engaged.

The Vit had nog flasher button for the High Beam from the factory, so the Yamaha flasher button is now the cancel button for the cruise control.

😁

I'll need to test ride it obviously, but according to the multimeter it should work 🤞🏻

I've got a mate at work who should be able to make some stickers with appropriate symbols to go over the one with the screen adjustment on it.

Also changed the heated grips, the ones that were on there were looking a bit second hand and had the nasty habit of switching themselves off at random intervals.
 
Very cool @nampus. Did you make the passing trigger work as "Cancel"?

I couldn't figure out how to connect separate buttons without having to add a common wire for each one of the controls.
 
The control unit for the cc used 4 wires, 1 ground, and 3 signal wires, one for each button. Pressing any button, would connect the wire of that button to ground.

For the Yamaha switchgear, the toggle switch had 3 wires (1 ground, 2 signal), and the flasher trigger had 2 wires(1 ground, 1 signal).

I spliced the ground wires from the toggle and flasher switch into a single wire and that single wire is now the ground for the cc controls.
 
Yes, that's what I thought it would take. Thank you for confirming that it would work like that.
I have a similar set up as yours (Kawi switch) but I want to change it to a flap style like the one on the duke ADV, that way I can used the TFT buttons for something else.
 
I'd like to be able to use one of those to turn on the light bar I added.
So far thanks to you I think I have the cruise control figured out.
I still need to figure the headlight's High bean for which I think I'll have to use a relay.
I just need to find an used 890 controller at a good price so I can experiment with it and confirm what can be done with it
 
Have you checked the price for a new unit, they are not extremely expensive.

Yes, they are not expensive, but I'm still not sure I want to pay full price for the part just to "find out". I might not even like it after all is figured out.
My current setup has all the controls I want on the same controller. The only things missing are the light bar switch and another button for a light I plan to add later.
The one drawback I see is that controls get bulkier the more stuff they have on them, and I have a Svartpilen, so my clutch perch is a little less forgiving with its placement.
I'm patiently scanning eBay for a cheaper one I can get for a price that won't stop me from throwing it away if it doesn't work.
 
Took apart the clutch master cylinder this afternoon. The fluid was looking dirty, and when I rebuilt the master last year or the year before it was full of crap, so I thought it can't hurt to open it up and clean it again.
It wasn't as dirty as last time, but it wasn't clean either.
Replace the fluid, bled it, and it's looking a lot better.

After someone mentioned the tyraps on the USB charger, they started bugging me, so I replaced those for the original bracket that came with the charger. No idea why I did not use that bracket in the first place, but it's on now.
1000022174.jpg
 
Took apart the clutch master cylinder this afternoon. The fluid was looking dirty, and when I rebuilt the master last year or the year before it was full of crap, so I thought it can't hurt to open it up and clean it again.
It wasn't as dirty as last time, but it wasn't clean either.
Replace the fluid, bled it, and it's looking a lot better.

After someone mentioned the tyraps on the USB charger, they started bugging me, so I replaced those for the original bracket that came with the charger. No idea why I did not use that bracket in the first place, but it's on now.
View attachment 6572
After u did the maintenance on the master cylinder was there any noticeable improvement in feel ?
My fluid is good but i'm thinking about doing both fluids anyway cos dealers say they do things but do they really ???
 
Last edited:
After u did the maintenance on the master cylinder was there any noticeable improvement in feel ?
My fluid is good but i'm thinking about doing both fluids anyway cos dealers say they do things but do they really ???
Haven't ridden the bike yet. But I'm not expecting any difference.

In the past the only thing is noticed with the clutch was that is was a lot easier to put the bike in neutral after bleeding it.

When finding neutral gets harder, I now know I need to bleed the clutch.
Somehow air does get it there over time.
 
Not impressed with the original DID VT2 chain this time.
The original chain that was on the bike from new lasted 28.000km.
The current VT2 has been on the bike for 10.000km and needed adjusting twice in the last 400km.
Both times is was very very slack. It has even worn through the black finish on the top of the swingarm
1000023733.jpg

Also found the front sprocket nut had cracked.
1000023740.jpg

Replaced the nut with a second hand nut from a 690 enduro which is steel instead of aluminium.
1000024080.jpg

Have ordered a new chain and sprockets.
Going for 15-40 instead of 15-41 this time.
And ordered a Regina HPE chain.
 
Back
Top Bottom