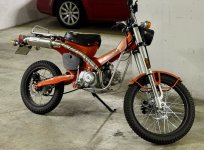
Hey guys, I just picked up a 2022 Vitpilen 401. After the first few days on it, I felt like the suspension was its weakest point. Also, I like messing with things soooo........
After crawling forums for possible shock options, I didn't like what was out there:
- 99 R6 / 07 R1, all these shocks were old and clapped out and needed rebuild before usage
- Nitron/Ohlins/K-tech/ext, out of my price range, heck I spent $3200 for the bike im not dropping $1500 for a shock
- YSS/RacingBros, kinda unproven and also $1000
After my own research I decided in going with the 23 Yamaha R1 shock i picked up on ebay for $140 with low milage on it.
- KYB (40/14) Mono Tube Piggyback
- 60mm stroke
- 318.00mm Length
- high and low-speed compression, rebound
- Thread on bottom eyelet --> easy to modify length if needed
- ball joint + needle bearing
OEM WP measurements:
eye to eye length: 305mm
eye width top: 32mm
eye width bottom: 32mm
R1 KYB measurements:
eye to eye length: 317mm
eye width top: 32
eye width bottom: 25
It didn't just bolt in but with a few modifications i was able to fit it in 2 hrs after work today.
Bottom spacers:
bottom eye needed 2x 3.5mm spacers, i think M10 washers would have worked in a pinch, but i turned up 2 aluminum spacers
Length Adjustment:
The bottom eyelet threads out, i removed it and cut it down by 8mm just above the threaded section, and put a large chamfer on the lock nut so it would thread on further but kept 4 full threads.


Top Eyelet fitment:
Ohh boy, this is where things get interesting. The casting for the R1 shock interferes with the upper shock mount casting, and modifications to the shock body were needed
The casting surrounding the top eyelet needed to be ground down to 20mm in width where it would interfere with the frame casting, with care to:
- minimize material removal for strength
- retain enough thickness for the ball joint seals


Honestly, I just winged it with an angle grinder, and it looked okay,
- Removed the spacers and seals that were inserted into the eyelet, both popped out without much of a fuss
- I used some washers and an m10 bolt and some washers to "guard" the spherical mount from my sloppy angle grinding
- protect the body with masking tape where i clamped to it, being careful not to crush the body
- cutting disk to slit either side
- cleanup with a flappy wheel and a file
- wire wheel to cover my shame


Here is how it looked after reasemly, eye to eye is now at 310mm

the shock went into the bike with no drama, the spacers for the bottom eyelet were annoying to line up, I was going to turn up a new bottom bushing of the right width, but since it was a needle bearing, it would have needed to be hardened and that's a lot of work.


Issues/TODO
- there is a bit of interference between the shock reservoir and the tubes that go to the evap canister. I need to delete it or get longer lines to run around it.
- The spring rate is wayy to soft. The R1 shock is supposed to be 88N/mm, but I tested the spring at 78N/mm. I think I need somewhere around 100-120N/mm; I would love some input here
- The length is still a bit long, I might see how it it rides and/or shorten the bottom eyelet even more. I think i can get another 2-3mm out of it and get the eye to eye down to 307mm without having to modify the shock body, right now with the supper soft spring the sag with me on is only lower by 8mm
Whats good!
- omg so much damping and adjustment
- it fits really well, with tones of clearance everywhere between hard parts
- adjusters are more accessible than the oem WP somehow, even the compression adjusters
- i get to feel special because no one has done this before
Feel free to give any input!
After crawling forums for possible shock options, I didn't like what was out there:
- 99 R6 / 07 R1, all these shocks were old and clapped out and needed rebuild before usage
- Nitron/Ohlins/K-tech/ext, out of my price range, heck I spent $3200 for the bike im not dropping $1500 for a shock
- YSS/RacingBros, kinda unproven and also $1000
After my own research I decided in going with the 23 Yamaha R1 shock i picked up on ebay for $140 with low milage on it.
- KYB (40/14) Mono Tube Piggyback
- 60mm stroke
- 318.00mm Length
- high and low-speed compression, rebound
- Thread on bottom eyelet --> easy to modify length if needed
- ball joint + needle bearing
OEM WP measurements:
eye to eye length: 305mm
eye width top: 32mm
eye width bottom: 32mm
R1 KYB measurements:
eye to eye length: 317mm
eye width top: 32
eye width bottom: 25
It didn't just bolt in but with a few modifications i was able to fit it in 2 hrs after work today.
Bottom spacers:
bottom eye needed 2x 3.5mm spacers, i think M10 washers would have worked in a pinch, but i turned up 2 aluminum spacers
Length Adjustment:
The bottom eyelet threads out, i removed it and cut it down by 8mm just above the threaded section, and put a large chamfer on the lock nut so it would thread on further but kept 4 full threads.
Top Eyelet fitment:
Ohh boy, this is where things get interesting. The casting for the R1 shock interferes with the upper shock mount casting, and modifications to the shock body were needed
The casting surrounding the top eyelet needed to be ground down to 20mm in width where it would interfere with the frame casting, with care to:
- minimize material removal for strength
- retain enough thickness for the ball joint seals
Honestly, I just winged it with an angle grinder, and it looked okay,
- Removed the spacers and seals that were inserted into the eyelet, both popped out without much of a fuss
- I used some washers and an m10 bolt and some washers to "guard" the spherical mount from my sloppy angle grinding
- protect the body with masking tape where i clamped to it, being careful not to crush the body
- cutting disk to slit either side
- cleanup with a flappy wheel and a file
- wire wheel to cover my shame
Here is how it looked after reasemly, eye to eye is now at 310mm
the shock went into the bike with no drama, the spacers for the bottom eyelet were annoying to line up, I was going to turn up a new bottom bushing of the right width, but since it was a needle bearing, it would have needed to be hardened and that's a lot of work.
Issues/TODO
- there is a bit of interference between the shock reservoir and the tubes that go to the evap canister. I need to delete it or get longer lines to run around it.
- The spring rate is wayy to soft. The R1 shock is supposed to be 88N/mm, but I tested the spring at 78N/mm. I think I need somewhere around 100-120N/mm; I would love some input here
- The length is still a bit long, I might see how it it rides and/or shorten the bottom eyelet even more. I think i can get another 2-3mm out of it and get the eye to eye down to 307mm without having to modify the shock body, right now with the supper soft spring the sag with me on is only lower by 8mm
Whats good!
- omg so much damping and adjustment
- it fits really well, with tones of clearance everywhere between hard parts
- adjusters are more accessible than the oem WP somehow, even the compression adjusters
- i get to feel special because no one has done this before
Feel free to give any input!


")

") , to supplement the fleet of 3d printers.
, to supplement the fleet of 3d printers.


