RobWCanada
expert rider
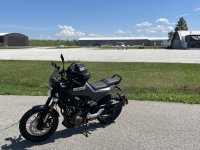
 Alright. So I said I’d post it and here it is. Keep in mind these modifications to the ring are so I didn’t have to remove or modify the tank rack. If I messed up the ring it was $40 CDN, the rack …who knows how much. $150?
This will/should work with a 401 or 701!
Parts List:
- TRT.00.787.16000/B - SW-Motech PRO Tank Ring - Triumph
- BC.TRS.00.152.30000 - SW-Motech Smartphone-Drybag für MOLLE-Aufsatz - Schwarz.
- BC.TRS.00.108.30000 - SW-Motech PRO Daypack Tankrucksack - 5-8 l.
- MAKE SURE not to get the "Magnet" version...that does NOT work with the tank ring mount.
- All PRO tank bags are "magnetic" to the ring...this is confusing and I almost bought the wrong bag myself!
- TRT.00.787.10100/B - SW-Motech Erhöhungselement für PRO Tankring/Tankringe - Schwarz. Für Erhöhung um 6 mm
- They call this the "height increasing element", it is needed. You could potentially get the 12mm and have it even higher. This would make turning the key easier.
- A2-70 (304, 18-8) stainless steel screws
- 2 x M5 x 0.8 x 25mm flat head cap screws
- 2 x M5 x 0.8 x 25mm button head cap screws (may be called "round head")
- 17/64" drill bit
I think that's it. Loctite 243 (not 242 -- not oil resistant like 243). I also use Loctite surface prep...but up to you.
PROS:
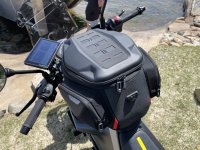
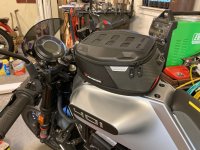
- So far I love it. Looks great, comes off easy enough once you get the hand of it. You have to pull directly forward (not forward and up).
- Bags are interchangeable -- so I can get the bigger bag and use it or if a one day small trip just put on the small bag!
- Comes with a waterproof cover
- Looks great
- easy to fill up due to removal (I had a strap system before)
- the bag is a magnetic mount. ...it kinda just drops on the mount and "snaps" into place...very neat.
- Same with removal, pull the strap and it "pops" up
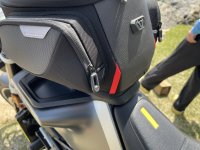
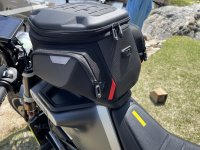
- Removal. Although fairly easy (much much easier than dealing with clips and straps woven through the tank rack) it does require some strength to pull the red pull release strap. This is not a fault of the system but rather how the Svartpilen tank filler location, key location and handlebars close to the filler. Handlebars make it slightly awkward to pull the strap. But like I said, once you get your position it's a quite pull and the bag kinda "pops" up and releases.
- Key vs bag location. Nothing can be done here. The key winds up under the front of the bag (you can see in some of the photos). You can still turn the key off and on, but would need to remove the bag to remove the key. It's okay as usually I'm stopping to put gas in anyway...or if your stopping you're probably taking the bag with you...I dunno. But do keep this in mind.
- Even with 12mm element height expander which would look odd imo, wouldn't allow you to remove the key while the bag was on
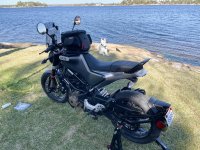
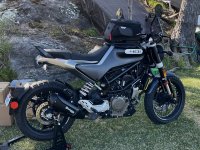
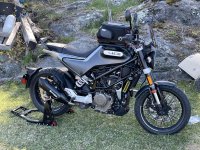
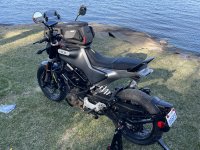
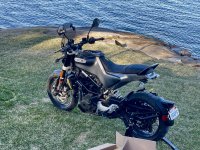
Anyway, here are the pics.
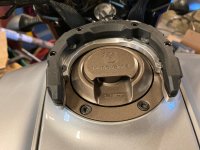
Tank Ring before modifications. The white marks on the left and right were estimates of how much needed to be removed to fit around the tank rack. I had to do about 2mm more. The ring is made of aluminum but even after modifications still seems very strong. About 1/8" thick. Use a sanding wheel or fine grinding wheel ...or maybe a dremel. Aluminum gunks up the surface...dunno if there's a better way to grind/sand aluminum.

Tank Ring after grinding and sanding smooth. I could have left it but decided to finish with some semi-gloss black Tremclad.
I also made the center holes by the screw studs a little larger as the holes are not "100%" but oh so close. I'm quite certain there isn't a closer matching tank ring.
I use a 17/64" drill bit to enlarge the holes. Honestly maaaaybe not required but I didn't want to go through the hassle of painting everything only to have to then paint the bored out holes later...lol


Traced the tank ring to a template, in case anyone wanted a guide...I can send you a better version of it if you want...

Last edited: